CVE-2021-4034: A Walkthrough of Pwnkit — the Latest Linux Privileges Escalation Vulnerability


Since 2009, more than 12 years ago, all major Linux distributions have been incorporating a high severity security hole that remained unnoticed until just recently. The vulnerability and exploit, dubbed “PwnKit” (CVE-2021-4034), uses the vulnerable “pkexec” tool, and allows a local user to gain root system privileges on the affected host.
Polkit (formerly PolicyKit) is a component for controlling system-wide privileges in Unix-like operating systems. It provides an organized way for non-privileged processes to communicate with privileged processes. It is also possible to use polkit to execute commands with elevated privileges using the command pkexec followed by the command intended to be executed (with root permission).
Due to an improper implementation of the pkexec tool, an out-of-bounds memory access can be leveraged by a local attacker to escalate their privileges to system root.
Security researchers at Qualys successfully reproduced the exploit on default installations of Ubuntu, Debian, Fedora, and CentOS and gained full root privileges on the vulnerable hosts. Other Linux distributions are likely vulnerable too, and perhaps some other Unix-like operating systems as well.
Immediately following is a background section which explains some concepts crucial to understanding PwnKit. If you feel confident with these concepts, feel free to jump to the next section.
Background and Concepts to Know
- pkexec – a command-line program that enables a user to execute commands as another user. If the program is called without a user argument, the default is to execute the command as root. This command is very similar to the sudo command in this aspect.
- Arguments of the main() function in C. In the C programming language, the main() function is the program’s first function that is called when the program is executed. It has an option to accept three arguments: argc, argv and envp:
- argv – The argv argument is an array of strings. Its elements are the command line arguments passed to the program when it was executed from the command line. The file name of the program being run is also included in the array and is its first element. So, for example, if we want to execute a cat command, with extra two arguments – foo and bar – we will write the shell command ‘cat foo bar’. In this case argc, which is the length of this array, is 3, and argv has three elements, “cat”, “foo” and “bar”.
- argc – An integer that represents the size of the argument array, argv, that is passed to the main() function. The argv array is of length argc, and consists of elements starting with argv[0] all the way to argv[argc-1]. The argc-th and last element of argv – argv[argc] – is a NULL pointer, which ensures that the list is terminated when it reaches its end.
- envp – This argument provides the function with access to the program’s environment variables, such as the PATH variable, which specifies a set of directories wherein an invoked executable program is searched.
- Out-of-bounds access – Programming languages such as C, provide powerful features of explicit memory management and pointer arithmetic. However, this comes at the expense of not having built-in protection against accessing or overwriting data in any part of memory. A common example is when dealing with arrays. It is up to the programmer to check if they are accessing an element that is within an array’s range, and does not exceed its size. For instance, suppose we have an argv array with length 4 (this means argc is 4). Should we access its 5th element – “argv[5]” – we would get a value that is not at all related to the array, but is the value of some other data that is adjacent in memory. This can result in undefined behaviour of a program, a crash and even in arbitrary code execution. Same goes for assigning a value to an element that is outside of the array bounds – ‘argv[5] = “something”’.
- Call stack – This is a fundamental concept in the way software works. A program is built out of multiple subroutines that call one another in a particular logic. The call stack is a place in memory that provides a function access to data such as its location and variables within its scope. Among the data that is stored on the stack for the main() function, are the argv and envp arrays. In fact, they are located right next to each other, such that the end of argv, argv[argc], is adjacent to the start of envp, envp[0].
- iconv_open() – This is a Linux command that can be used as a function inside C code. It is a short for Internationalization Conversion and its purpose is to find a suitable library that can convert a given string from one encoding to another (for example – UTF-8 to UTF-16). One of the ways by which iconv_open() finds such a library, is by reading whatever file is present in the GCONV_PATH environment variable, and executing it. Given its ability to hold references to arbitrary libraries which are then executed, the GCONV_PATH variable was notoriously known for facilitating Code Execution exploits. It is for that reason that the GCONV_PATH environment variable is omitted when executing programs such as pkexec, which deal with running commands with temporary elevated privileges.
That’s all on the background side. Now let’s get to the exploit.
Exploit
A Simple Out-of-Bounds Access
pkexec’s syntax is as follows:
pkexec [ –user username ] PROGRAM [ ARGUMENTS …]
It takes a username (which defaults to root when not passed) and a program file path, and executes it on behalf of this user.
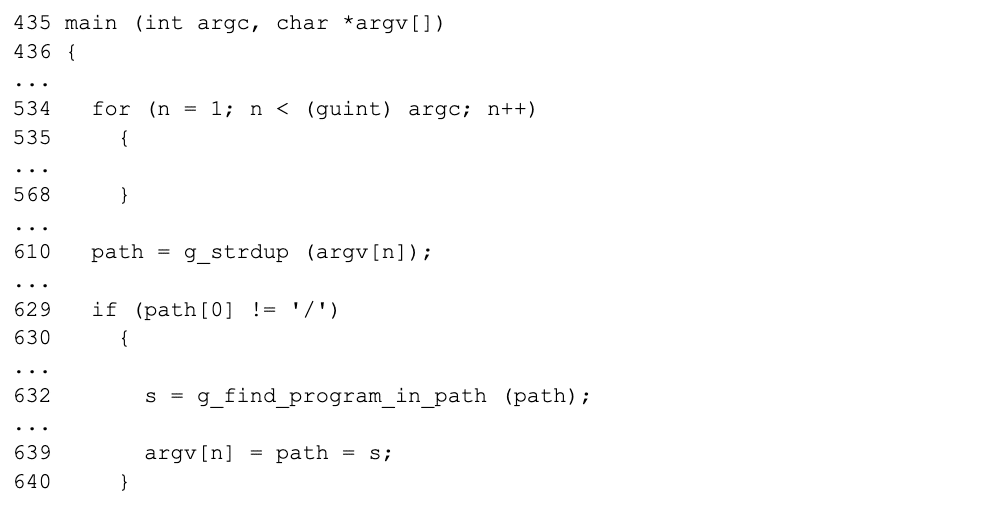
Below is a portion of the pkexec’s main() function, which is given the arguments above when the command line is executed:

As we can see, the program iterates through the argv elements (line 534). By the time we get to line 610, the for loop has already terminated, and n is now equal to argc-1, which means that argv[n] points to the last argument passed – the target program path to be executed by pkexec. The program now checks if the given target program’s path is an absolute path, which starts with a slash (line 629). If not, it calls the g_find_program_in_path() function to find the absolute path of it (line 632). argv[n] is then modified to hold the now absolute path of the target program.
That is all. This is an expected behaviour of the main() function. But what if we call pkexec with zero arguments? And by zero arguments, I mean without even the first argument that is the pkexec path itself?
How would the above code look now?
The main() function is called, with argc being 0 and argv being empty, that is, containing only a NULL pointer (line 435). The for loop initializes n with a value of 1, and an end condition that n should be less than argc (which is, in our case, 0). This condition of course is not met, as n==1 and can’t be less than 0, which means the loop immediately terminates, which leaves n with a value of 1.
And now the interesting part begins:
Line 610 copies argv[n] to path. argv[n] of course exceeds the array’s length (which is empty), which means the code reads beyond the bounds of the array – an out-of-bounds read.
Moving on, line 632 calls the g_find_program_in_path() function, and tries to find the absolute path of the program name in path, which by now is unknown to us, as it was fetched from a value read out-of-bounds. Suppose there exists a file with the same name as path’s value, its absolute path will now be written back to argv[n] – again accessing the argv array beyond its bounds – which triggers an out-of-bounds write (line 639).
At the end of this flow, a memory location outside of the argv array, which could possibly point to a string which is a file name, is overwritten with the absolute path of the file.
An out-of-bounds read and write, what benefit does it have? It’s not as if we can control the out-of-bounds memory location which is read from and written to… Or can we?
Using our Call-Stack
For those of you who read the background section – your patience now pays off.
When we run the pkexec command, we can pass it the argument list parameters, argv and argc, and also the environment list, envp. Note that although the main() function of pkexec does not use the envp argument, it is still passed to it and stored in the function’s available memory.
As described earlier, the main() function, like every other function, can access its arguments and variables thanks to the call stack, which stores them in an orderly fashion. The argv and envp arrays are stored alongside each other, as seen below:

The elements of argv are stored in successive memory locations, all the way to the NULL pointer argv[argc]. Immediately following it are the elements of envp, starting from the first one, envp[0], all the way to the NULL pointer envp[envc].
For us, what’s interesting about this arrangement is that when pkexec incorrectly accesses the out-of-bounds argv[n] element (remember, n==1 and argc==0), it’s actually accessing and modifying the envp[0] element. Why? This is because argv[argc] is in our case argv[0], and argv[n] is argv[1], which in memory resolves to the address following argv[0], which is envp[0].
Now the question again is, can we control the value that is accessed out-of-bounds, envp[0]? Well, yes! envp[0] holds the first environment variable that is passed to pkexec when it is executed. Furthermore, we can control the environment variables we want to pass to pkexec when we execute it. Which means envp[0] is ours to control.
Now, let’s call pkexec with the following conditions:
- We will set its argument list to an empty array – {NULL}
- We will set its environment variable list to – {“somefile”, “PATH=execdir”, NULL}
- We will create an executable file in the execdir directory, located at our current working directory.
This will be the corresponding call stack within main():

This sets the PATH environment variable, explained in the background section, to hold a reference to the execdir directory. The main() function will now read envp[0], which is “somefile”, and try to find the absolute path of it in the current directory. It will find it, as we’ve created it under ./execdir/somefile. Finally, it will overwrite envp[0] with the absolute path of execdir/somefile.
Time for GCONV_PATH
Remember the GCONV_PATH exploit? It uses the iconv_open function to execute the executable file listed in the GCONV_PATH environment variable. Unfortunately for us exploiters, the GCONV_PATH is omitted from pkexec’s environment when executed, due to its known security issues. But now, having the control over envp[0], one environment variable is all ours to manipulate. Can we insert the GCONV_PATH into pkexec’s environment after all?
Let’s fine tune our exploit a bit more. Suppose we now call pkexec with the following conditions:
- We will set its argument list to an empty array – {NULL}
- We will set its environment variable list to – {“exploit”, “PATH=GCONV_PATH=.”, NULL}
- We will create a directory called GCONV_PATH=..
- We will create an executable file exploit, located under the GCONV_PATH=. directory, such that the file’s path is GCONV_PATH=./exploit. This file will hold a simple code which executes a shell under root privileges.
This will be the corresponding call stack within main():

This sets the PATH environment variable to hold a reference to the GCONV_PATH=. directory. The main() function will now read envp[0], which is “exploit”, and try to find the absolute path of it in the PATH directories list. It will find it, as we’ve created it under the GCONV_PATH=. directory. Finally, it will overwrite envp[0] with the absolute path of GCONV_PATH=./exploit.
All set, we have introduced the exploitable GCON_PATH environment variable to pkexec’s environment. Last thing to do is to somehow trigger iconv_open, and make it use GCONV_PATH to load and execute our malicious file, exploit.
Exploiting pkexec’s input validation functionality
Fortunately, there is a way. pkexec’s code flow has a lot of conditions for validating user input. When it encounters improper syntax or invalid values in the command line arguments passed to it, or in the environment variables it is given, it prints an indicative error message using Glib’s g_printerr() function. This g_printerr() function by default prints messages in UTF-8 encoding. But, in case the CHARSET environment variable is not UTF-8, let’s say, UTF-16, then it will need to call iconv_open() function, to convert the output string from UTF-8 to UTF-16. iconv_open() in turn will look for the conversion descriptor file, listed in the GCONV_PATH environment variable and execute it. Nice.
We’ve found a way to force pkexec to execute our malicious file that is listed under the GCONV_PATH.
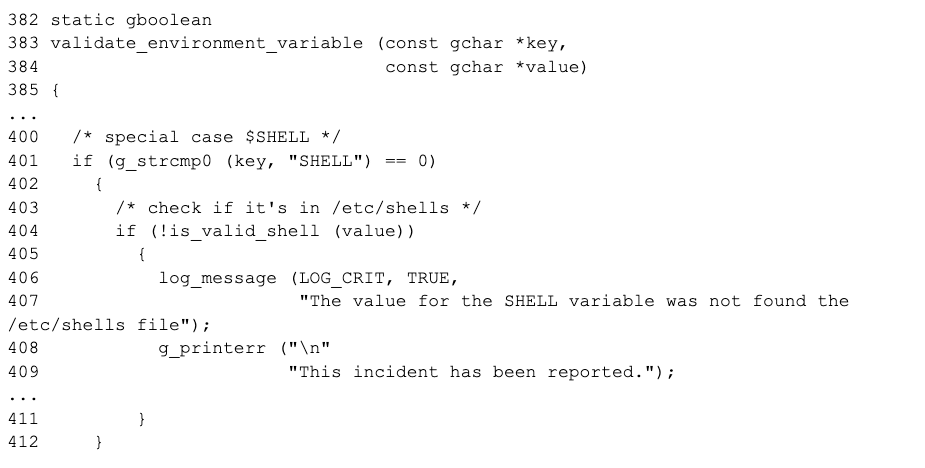
We still need to figure out how to invoke one of the g_printerr() calls “scattered” around pkexec’s code. For this, we will use the following function, validate_environment_variable:

This validate_environment_variable function is responsible for verifying that a given environment variable is valid, that is, secured and cannot be leveraged for any exploits.
After some validation checks, there remains a special case to check, in which the environment variable’s key is “SHELL”. We can see that check in line 401, after which there is a check whether the value of the SHELL environment variable is valid, that is, located under the /etc/shells directory. If it’s not, g_printerr() is called to generate an error message, which for us means victory.
Thus, all we have to do is supply pkexec with a couple of additional environment variables, SHELL and CHARSET.
Final Steps
Our final exploit is ready. We will now call pkexec with the following conditions:
- We will set its argument list to an empty array – {NULL}
- We will set its environment variable list to – {“exploit”, “PATH=GCONV_PATH=.”, “SHELL=/not/in/etc/shells”, “CHARSET=NOT_UTF8”, NULL}
- We will create a directory called GCONV_PATH=..
- We will create an executable file exploit, located under the GCONV_PATH=. directory, such that the file’s path is GCONV_PATH=./exploit. This file will hold a simple code which executes a shell under root privileges.
pkexec is executed with the conditions above. The call stack of main() is as below:

pkexec will now access envp[0], resolve its value exploit to the absolute path of GCONV_PATH=./exploit, where our malicious file is located, and write it back to envp[0]. Next, it will proceed with validating the environment variables we supplied, one by one, until it gets to the one located in envp[2]. It will validate it against the special case, and since it does not meet the conditions of a valid SHELL path value, it will print an error using g_printerr(). g_printerr() will check for the CHARSET environment variable, which we populated with the value of “NOT_UTF8”. Since it is not a UTF-8 encoding, it will call iconv_open() to help it convert the encoding of the error message to “NOT_UTF8”.
iconv_open() will refer to the conversion file located in the GCONV_PATH environment variable, which expectedly holds our malicious exploit file. iconv_open() now loads and executes exploit, and Boom! Exploit success.
Conclusion
This is a classic and neat memory corruption vulnerability. Learning to understand such vulnerabilities can help the security researchers among us to better find these holes, and help the community by pointing them out and helping to fix them. For the developers among us, it’s a great way to learn some good and bad practices in handling memory, on the way to making our open-source software more secure.
Staying Ahead of This Vulnerability
In order to make sure that your dependencies are updated and secure, we recommend you:
Keep your open source components up to date with tools like Mend Remediate to make sure direct dependencies are automatically patched to the latest version.
Integrating automated security into your repo, so that issues are addressed as soon as possible, is the best way to mitigate open source risks early, before they hit the headlines.