Top Tips for Getting Started With a Software Composition Analysis Solution


You’ve purchased a software composition analysis solution, and you’re excited to start scanning. Before you do, read our top tips for getting started with Mend. Following some basic guidelines ensures your implementation gets off on the right foot.
1. Build a Team

Mend is an organizational initiative, not a one-person solution. If you want your implementation to be successful, the first thing you should do is assemble a cross-functional team of internal stakeholders.
Because Mend addresses both license compliance and security vulnerabilities, your team should include not only developers, but also members from your legal, security, and DevOps or DevSecOps teams. Management buy-in is also critical. When management promotes an initiative companywide, it shows that the initiative is strategic to the company’s success and worthy of employees’ time and effort.
Assembling the right team from the beginning facilitates communication and sets you up for success. When everyone is on the same page, identifying the team’s goals and responsibilities is much easier. This pays dividends further down the line when, for example, you begin defining your open source policies. If you have clearly defined roles, it’s easier to create policies and identify approvers in specific workflows.
2. Set a Goal Beyond Scanning

We frequently hear our customers say their goal in purchasing Mend is to scan their code base. Although it is true — Mend does indeed scan your open source code! — you need to look at the bigger picture beyond just scanning to get the most value out of Mend.
Scanning code is only the first step in managing your open source use. Once an initial scan is complete, you need a plan to act upon the results, whether that involves remediating vulnerabilities or resolving non-compliant or non-compatible open source licenses. You will be much more successful if you set concrete goals with an intention beyond scanning, such as eliminating restrictive GNU GPL v2.0 licenses or shipping products with no high severity vulnerabilities.
Setting tangible goals helps focus your organization’s efforts. Depending on your focus, Mend provides a wide range of reports from Inventory, Attribution, and License Compatibility reports to Vulnerabilities, Organizational Risk, and Effective Usage Analysis reports to Audit Change Log reports, to name just a few. Once you understand your broader goals, you’ll know which reports work best for you.
Having well-defined goals allows you to get the most out of your SCA solution. It also helps you identify your organization’s processes so you can determine what steps in your open source security process can and should be automated throughout the software development life cycle (SDLC).
3. Get to Know the Mend Data Model

To get the most value out of your SCA platform, you need to integrate it throughout your development process. To do that, you first need to understand the Mend data structure.
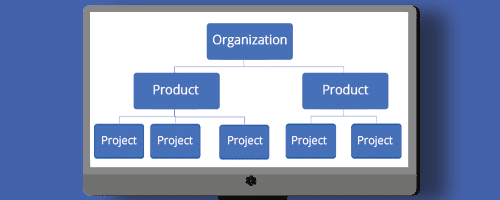
The Mend data structure is made up of three tiers:
-
Organizations. An organization is the top level in the Mend data hierarchy. Think of it as similar to a business unit. An organization’s inventory is made up of all the open source components from all products and projects within an organization and shows aggregated information regarding licenses, security risks, alerts, and more.
-
Products. A product is the tier below organizations and can be thought of as mapping to an application. A product’s inventory is made up of all open source components found within its projects and shows aggregated information regarding licenses, security risks, alerts, and more.
-
Projects. A project is Mend’s smallest component. It can be mapped to a build or a module in your development environment. A project’s inventory is made up of all the open source components found within that project.
Your organization may not map perfectly to Mend’s data model, and that’s OK. The point is that you need to be aware of your own environment before you scan.
Once you understand how your existing code and project correlate to Mend’s data model, you can identify and document the points in your process where scanning makes sense. Typically scans are performed in a production CI/CD pipeline, but they can also be done in QA builds as well to really leverage policies. To get the most out of Mend, you want to scan in as many places as possible. As they say, scan early and scan often.
4. Make Policies Work for You

Mend’s automated policies allow you to set and enforce rules for open source adoption. These policies are flexible to meet your individual needs. Policies can be defined according to security vulnerability severity score, open source license type, software bug severity, outdated version of a component, and more. You can approve, reject, initiate an approval flow, or trigger an issue ticket based on your criteria and definitions.
A key advantage of Mend policies is you can enforce different policies at different stages of the SDLC. For example, you might allow certain types of libraries into the artifact repository but block them from the build or production environment.
To implement tiered policy enforcement, you create different products for each phase of the SDLC (for example, repo, build, and production). Once these products are created, you integrate each with the relevant step of the SDLC, then create distinct policies for each. Policies are automatically enforced in the corresponding tools during the different steps of the SDLC.
Again, this is an organization initiative that requires assignments and groups. Because you’ve already identified key stakeholders, you understand assignments and groups, including which users are responsible for resolving pending tasks such as updating licenses, running reports, or remediating vulnerabilities.
Having well defined policies that address different stages of the SDLC allows you to be very intentional about which open source components you use and who is responsible for specific tasks at each stage.
5. Start Small

When you’re finally ready to scan, starting with your entire code base is going to be overwhelming. If you haven’t been remediating security vulnerabilities, you might be surprised with how many issues need to be resolved.
To get a sense for how Mend works, we suggest you start small with a project you know well and begin with manual scanning at the command line. Scanning a familiar project that is easily digestible makes it easier for you to learn how the process works and how Mend data is presented. Scan this way multiple times until you really know it. This is not the best practice, but it is the best first practice.
Once you’re ready to scan automatically, use detect mode, otherwise the config file will be too daunting. It may seem obvious, but it’s worth repeating: Using detect mode is important because the scanner settings have a huge effect on your results. Once you become familiar with scans and the config file, you can build from there.
Next Steps
Now that you have taken the first few steps toward managing your open source components by assembling a team, defining your goals, and completing a few scans, you can begin to apply these policies and processes at scale across your organization. Starting small and building on a solid foundation helps ensure you’re proceeding with clear guidance, governance, and remediation plans. Success is sure to follow.
